Below are the steps to connect MicroBiz Hub with MicroBiz. This will allow you to access the following modules:
- PriceCompare (Create product records in MicroBiz POS with one click using Vendor Catalog data. Build vendor orders and send to MicroBiz POS as Purchase Orders.)
- Physical Inventory Count
- Employee Time Clock
- Range Facility Management
- Recurring Billing
STEP ONE - Activate connection in MicroBiz Hub
Using the Hub module switch at the top left of the screem, confirm that you are in your desired module.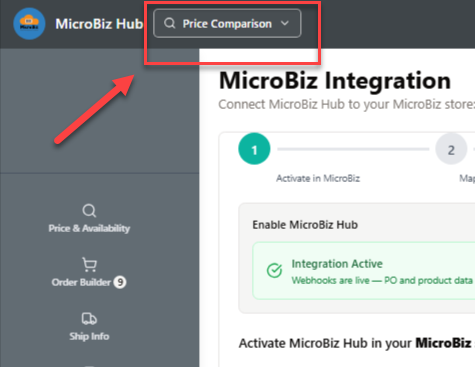
Once in your desired module in MicroBiz Hub, activate the MicroBiz Hub-MicroBiz POS Integration at Settings>MicroBiz Sync Settings using the toggle top right. This page will display your MicroBiz Hub URL which will be used to connect the app to MicroBiz POS in Step Two.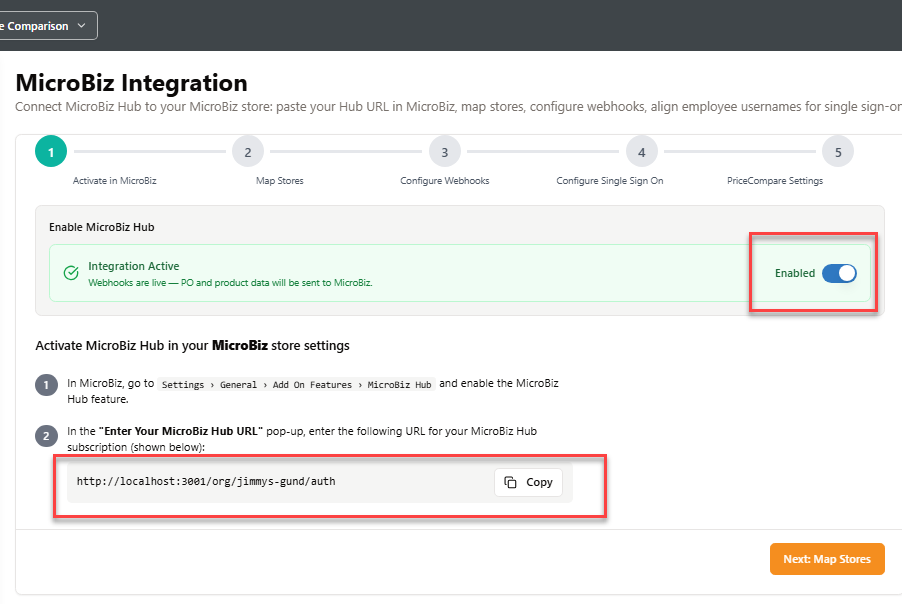
STEP TWO - Activate connection in MicroBiz POS
In MicroBiz POS go to Settings>General>Add on Features to activate the MicroBiz Hub integration in MicroBiz.
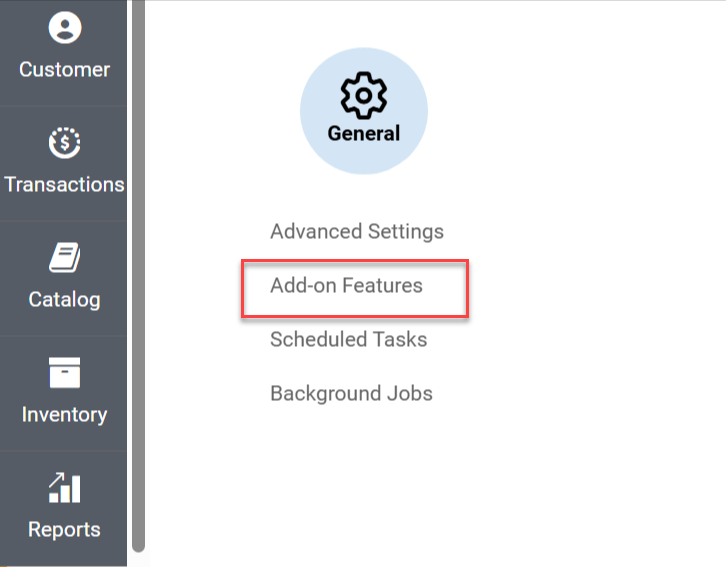
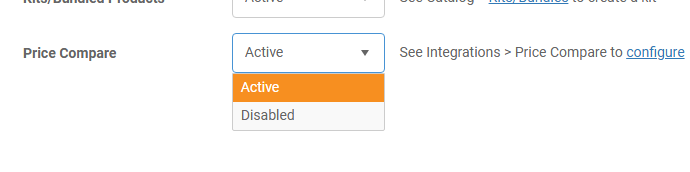
Once you have activated the MicroBiz Hub connection in MicroBiz POS, you will see a field allowing you to enter your MicroBiz Hub URL in MicroBiz.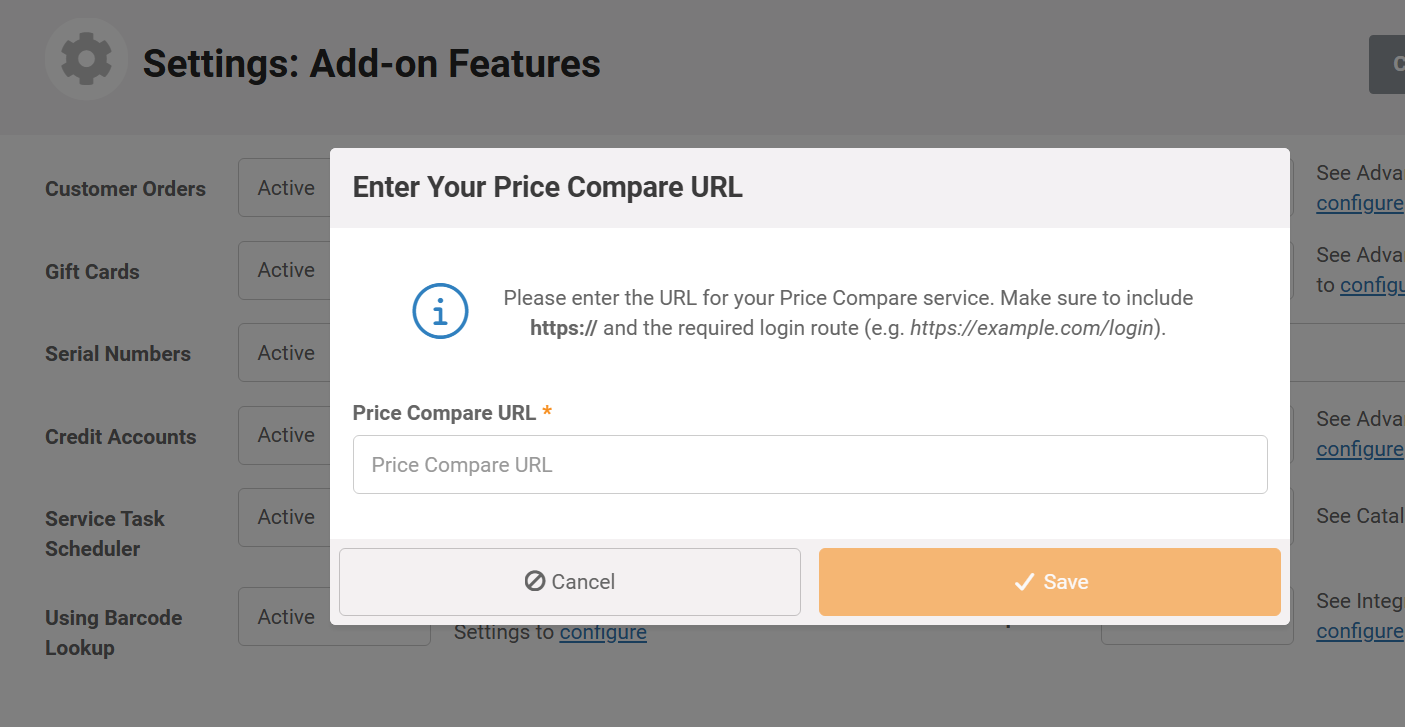
Copy/paste the URL of your MicroBiz Hub login in screen displayed at MicroBiz Hub>Settings>MicroBiz Sync Settings into the in the MicroBiz POS.
Or, this can be copied from your browser. Example: https://pricecomparehub.com/org/test-store/auth. If you do this be sure to copy the URL for your store's login screen.
Correct: https://pricecomparehub.com/org/test-store/auth
Incorrect: https://pricecomparehub.com/org/test-store/
Incorrect: https://pricecomparehub.com/org/test-store /integrations
Incorrect: https://pricecomparehub.com/org/
STEP THREE - Enter MicroBiz POS store name and store number in MicroBiz Hub
You will need to enter the exact name of the MicroBiz POS store in the Hub settings so that any orders are routed to the correct MicroBiz POS store
You can find your MicroBiz full store name at MicroBiz Settings>Store>Stores.
In the example below, the Store Name that should be copied is 'Staging Firearms' and not the Short Name of 'Main' or the Store Number.
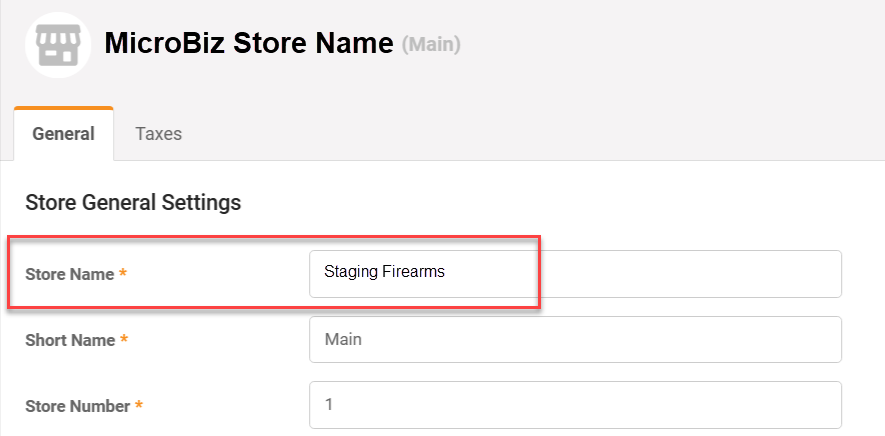
Once you have copied your MicroBiz Store Name, switch back to MicroBiz Hub and paste it into the 'MicroBiz Store Name' field at Hub>Settings>MicroBiz Sync Settings>(2) Map Store.
In addition, you need to enter the Store Number from MicroBiz POS into the corresponding MicroBiz Store # field in MicroBiz Hub.
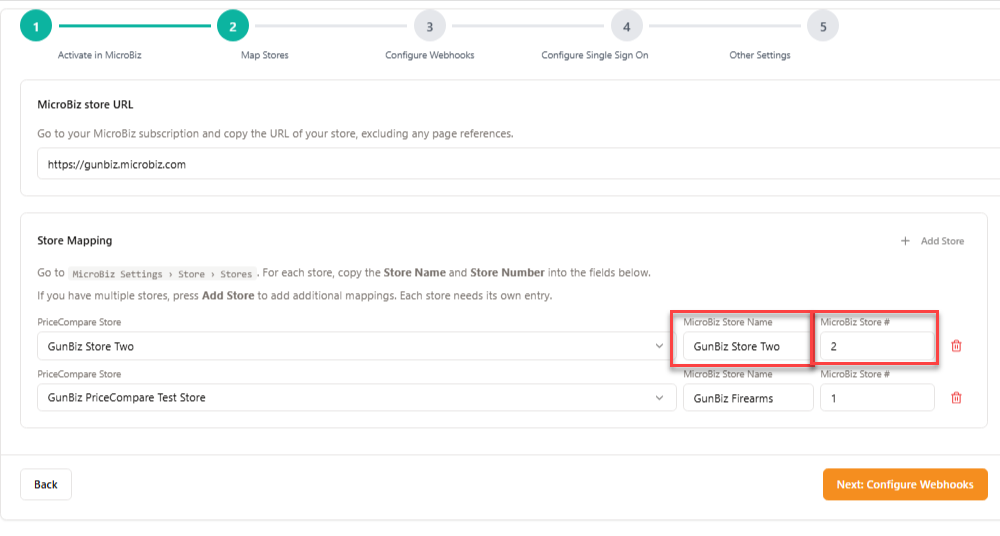
If you have multiple stores, you will need to press the 'Add Store' button at screen (3) in the Hub set up wizard to add fields for multiple stores.
Pro Tip: If you get an error on your first PO synced, double check that the MicroBiz 'Store Name' into the field above. Do not use the MicroBiz store Short Name. In the example above, the Store Name entered in PriceCompare should be 'Staging Firearms' and not the Short Name of 'Main'.
STEP FOUR - Generate API Connection Keys in MicroBiz
Once the Hub integration has been activated in both MicroBiz POS and Hub, link the two applications by generating 'Connection Keys' in MicroBiz POS and copying and pasting then into Hub. Go to MicroBiz>Settings>Integrations>PriceCompare - and then press the 'Generate Keys' button.
This will generate one-time credentials for syncing vendor orders and syncing product records.
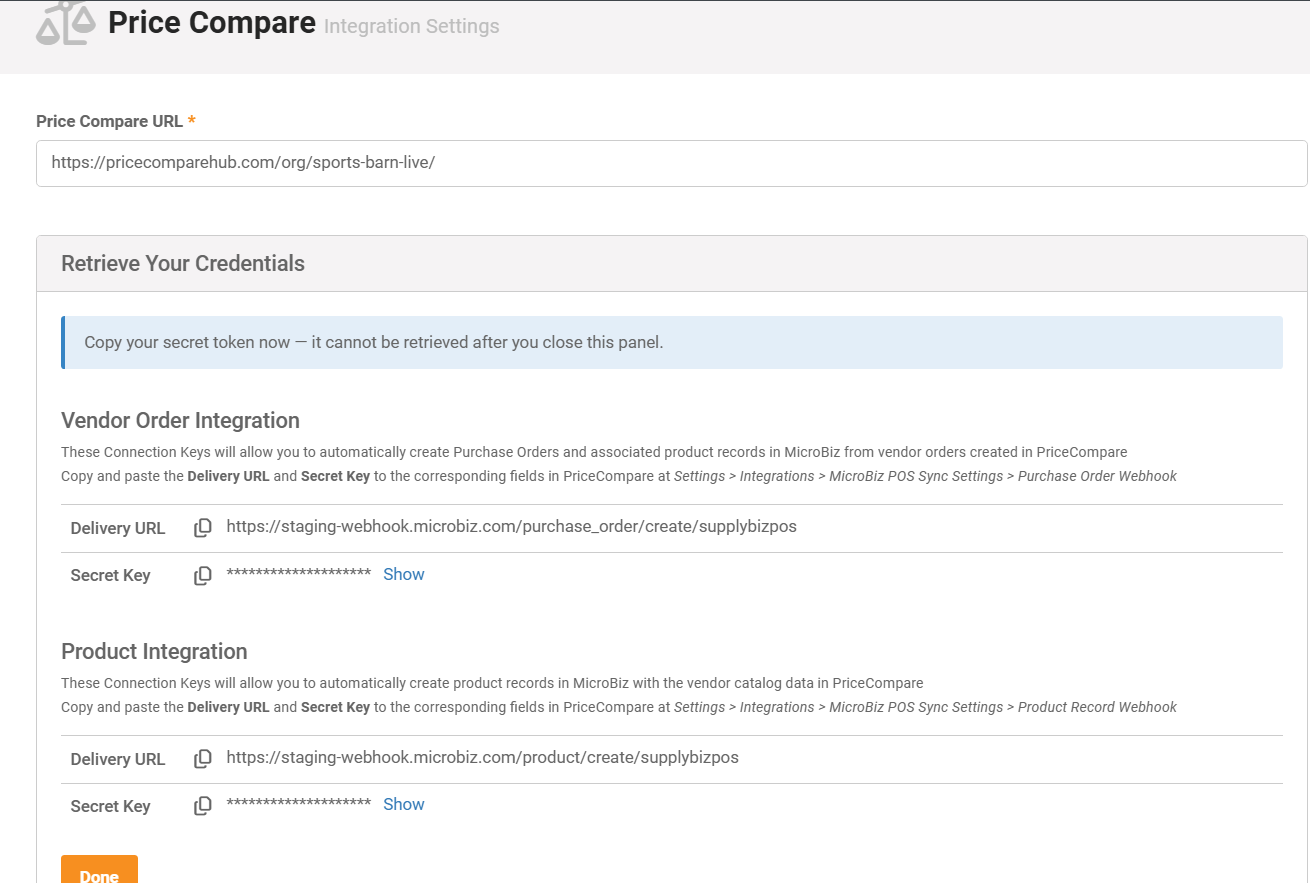
Once you have generated the API connection keys, paste the connection keys into Hub
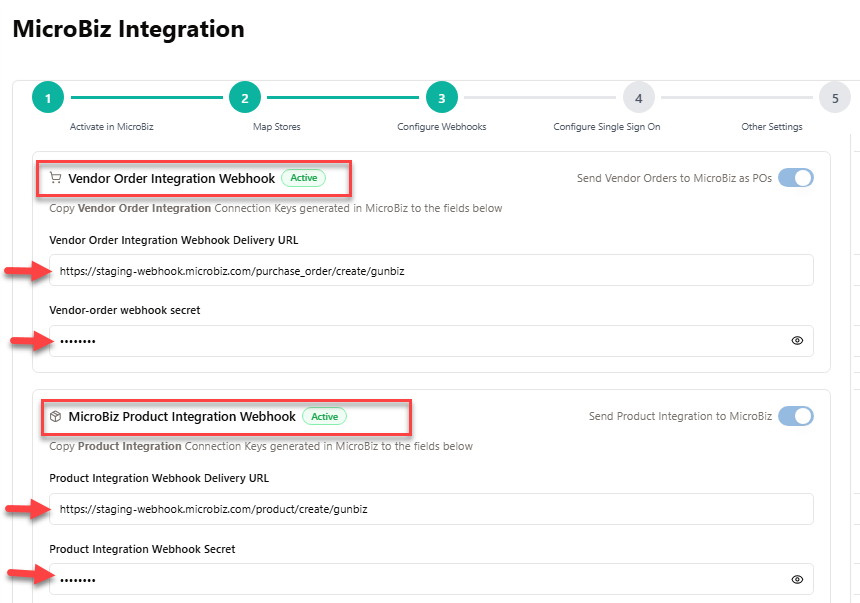
Once you generate the Connection Keys in MicroBiz, copy and paste the Connection Keys into the corresponding fields in the PriceCompare set up wizard (see below).
Important - Be sure to paste the 'Vendor Order' connection keys from MicroBiz into the 'Vendor Order' integration fields in PriceCompare - and the 'Product' record connection keys from MicroBiz into the 'Product' integration fields in PriceCompare.
STEP FIVE - Configure default statuses on data synced
Configure 'other settings' based on the module selected
PriceCompare Module
Field used as 'SKU' - This determines what value in PriceCompare will be synced to the SKU field in MicroBiz. This could be the UPC, Manufacturer Part Number or Vendor SKU. Most retailers use the UPC or manufacturer part number.
Categories Included - This setting determine which categories are sent to MicroBiz when syncing Product Records. Options include:
- PriceCompare Categories only: Only the first-level PriceCompare category selected on the vendor order (recommended). This will allow you to sync consistent categories to MicroBiz
- PriceCompare + Vendor Categories: Selected PriceCompare first level category plus subcategories from the product's default vendor
- Vendor Categories only: All categories and subcategories from the default vendor in the Master Product Catalog
Note: there is little consistency across the categories of the various vendors. Therefore, we recommend using the first-level PriceCompare categories and not the categories supplied by the vendors in their catalog feeds.
Initial PO Status in MicroBiz on Order Sync - When syncing a vendor order to MicroBiz as a purchase order, this setting will determine the default status of the new purchase order created in MicroBiz. Options are
- Draft - This status is used to designate that the PO has not yet been submitted to the vendor
- Open (recommended) - This status is used to designate that the PO has been submitted to the vendor
PriceCompare Order Status After MicroBiz Sync - This is the Status applied to the PriceCompare vendor order after successfully sending to MicroBiz (default: Submitted).
OTHER IMPORTANT REQUIREMENTS - Conform vendors and categories between systems
Make Changes so that Vendor Short Names Match Between MicroBiz and PriceCompare
If you use the Create PO feature, your vendor short names in PriceCompare must match your Vendor Short Codes in MicroBiz. Otherwise the PO sync will fail or duplicate vendor records will be created.
Please go to MicroBiz>Settings>Catalog>Vendors and change the Short Codes in MicroBiz to match the Short Codes in the table below.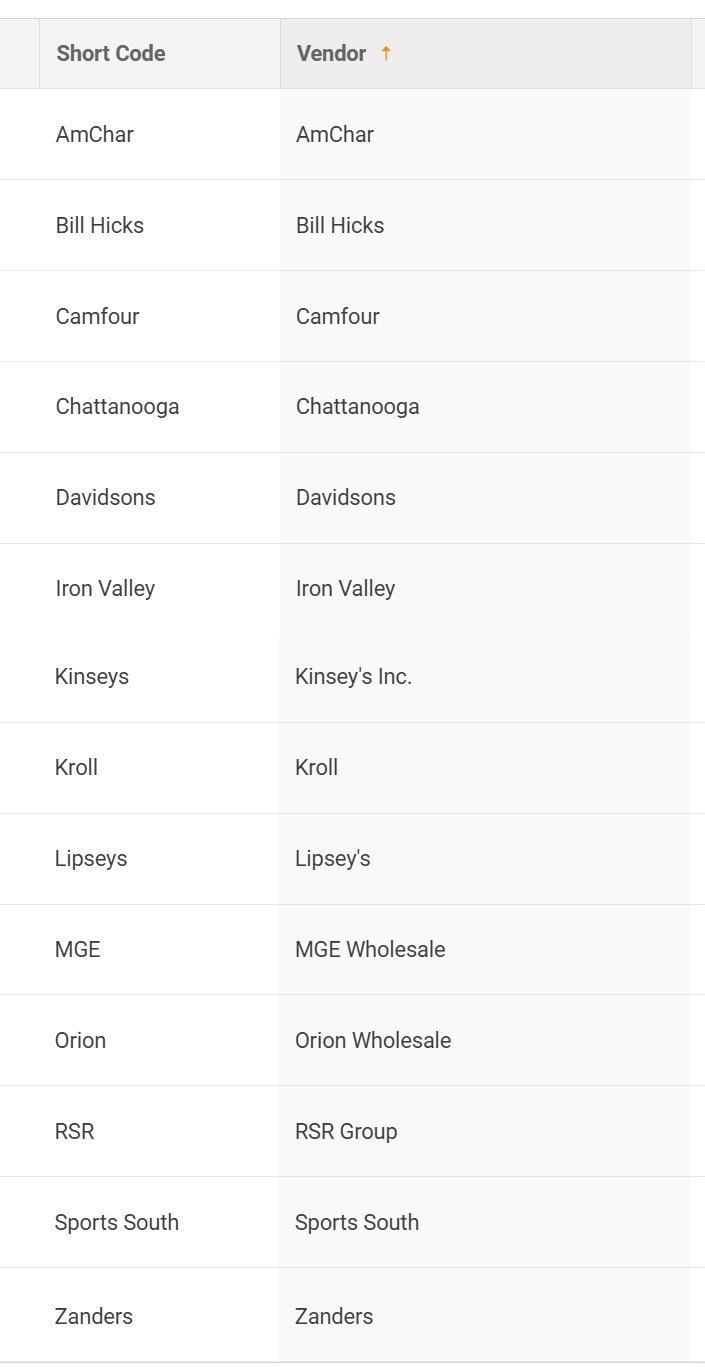
Confirm that your Categories in PriceCompare Match MicroBiz Categories
Below are the default initial categories in PriceCompare. You will have the ability to choose the category for a product before syncing the product record with MicroBiz.
To avoid duplicate categories being created on product syncs, we recommend modifying category 'Names' in either MicroBiz at MicroBiz>Settings>Catalog>Categories or in PriceCompare at PriceCompare>Settings>Product Categories so that the first level categories match between systems.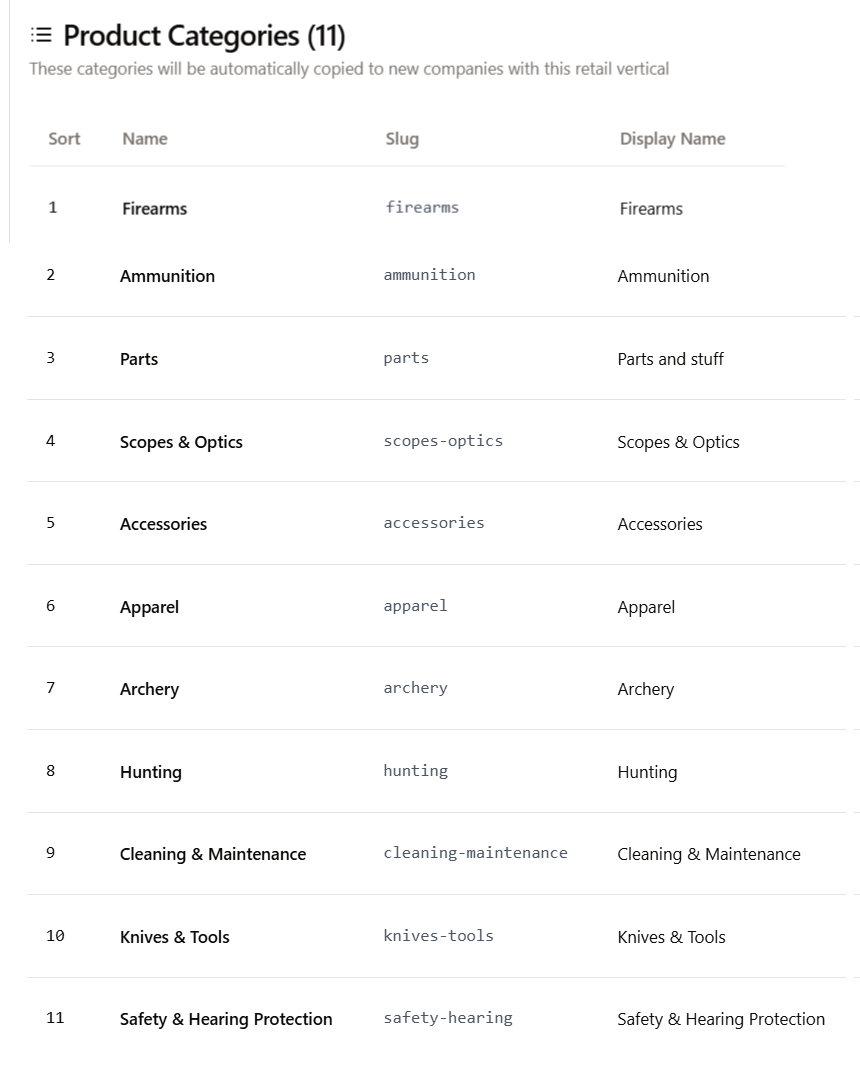
Review Price Rule Settings
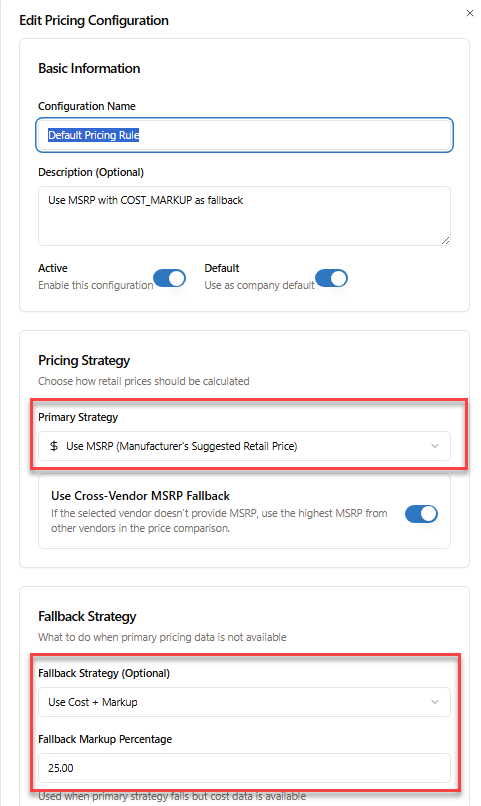
If you import the items on a Vendor Order into MicroBiz as products, MicroBiz requires a Price. Some products have an MSRP or MAP from the vendor, while some products do not. PriceCompare has a Price Rule setting at PriceCompare>Settings>Pricing Rules that allows you to decide what price should be sent to MicroBiz with the other product information.
We suggest using MSRP if available with a targeted margin or mark-up as a fall back. The default settings is (1) MSRP if available, and (2) if not available 25% mark-up over cost.
You can change these pricing assumptions based on your needs.
We also suggest keeping the ‘Cross Reference MSRP’ field enabled, as this will enable the system to use the MSRP from another vendor if the MSRP is not available from the ordering vendor.
FREQUENTLY ASKED QUESTIONS
How do I set up my vendors to obtain my store specific pricing and availability?
We have a separate help article on this. Please see https://cloudv2.microbizcloud.com/support/solutions/articles/9000272880-setting-up-vendor-credentials-in-pricecompare-firearm-vendor-distributor-feeds