MicroBiz offers a separate web-based app named CountApp that can be used to manage a physical inventory count. This app is provided for free to MicroBiz users as a stand alone tool - or is bundled with other add on modules, depending on your plan. The CountApp tool can be used to conduct a physical inventory count of your store or stores comparing the physical count against the expected stock from your MicroBiz Cloud POS system - and then updating the open stock levels in MicroBiz to reflect the results of the physical account.
Set Up
Log in to PriceCompare.
The Count App is a tool either a stand alone tool that you sign up for on our website - or is included with our PriceCompare add-on module.
If you already have access to your PriceCompare module, you can just log into the PriceCompare application using your username and password and proceed to the steps below.
If not, go to our website and on the page for the physical inventory account feature, click on the access inventory count button. See https://microbiz.com/physical-inventory-count-scan-app/
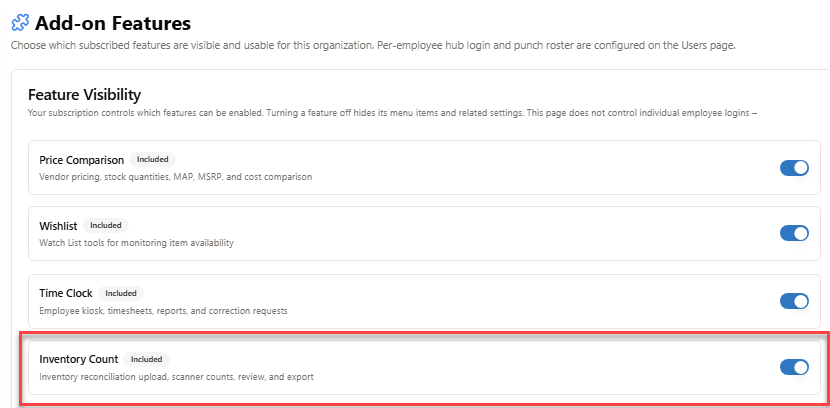
Activate Count App physical inventory count tool from settings/add-on-features.
If you do not already see an option for Count App under Settings>Tools, go to Settings > Add-on features and activate the toggle for the Count App physical inventory count tool.
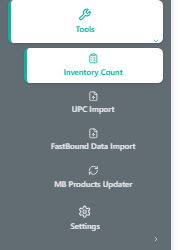
Access Count App from Settings > Tools
Once you have activated the CountApp physical inventory count tool, you can start your count.
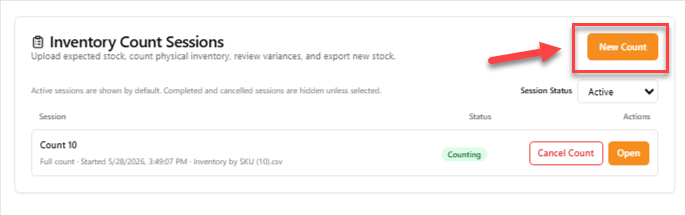
Start new inventory count
To start a new count, press the New Count button at the top right corner of the screen.
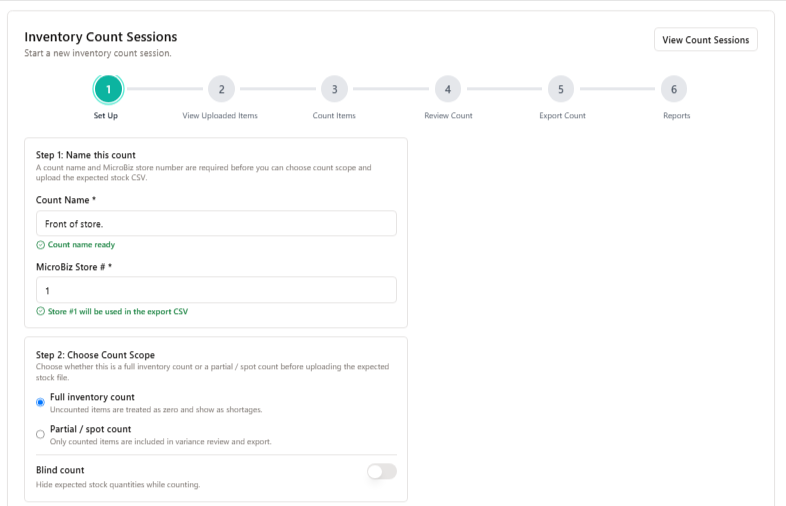
Configure settings for the count.
You will need to configure a few settings before beginning your count.
Count name - this will describe the count being done. This could be generic, such as 'June Annual Count', or you can be specific for what parts of your business you are counting, such as aisles 1 and 2.
MicroBiz store number - when you update your MicroBiz inventory for the results of the count, you will need to assign a store number. In MicroBiz, go to Settings > Store > Stores to obtain the store number for this count. If you have only a single store, this will generally be '1'.
Choose Count Scope - you will need to decide whether this is a full inventory count or a partial or spot count. For a full inventory count, we'll show you all the items in the system with inventory that were not scanned in your count. For partial count, we'll compare the expected stock to physical count for only the items scanned during the count session.
Blind Count - in a blind count, the employees conducting the scan will not be shown the expected count. This will allow employees to scan items "blindly" without being influenced by the expected number.
Upload Expected Stock File
If you're not doing a blind count, you will need to import the expected stock file from your MicroBiz point-of-sale system.
To do this, go to Reports > Inventory Reports > Inventory By Item Report.
Here are a couple steps to make sure that you are exporting the correct data.
Be Sure to Add UPCs to the Expected Stock file exported from MicroBiz. The CountApp will compare the code read by the scanner from a scanned barcode to a product ID uploaded from the MicroBiz expected stock file. If you are scanning UPCs stored in the Alternate ID fields in MicroBiz, be sure to include the UPC field in the MicroBiz export file.
To do this, change the Visibility filter in the MicroBiz Inventory by Item report from 'Product' to 'SKU'. This will enable you to add the UPC columns to the exported data.
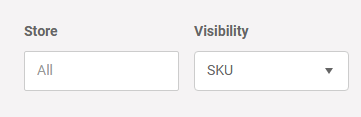
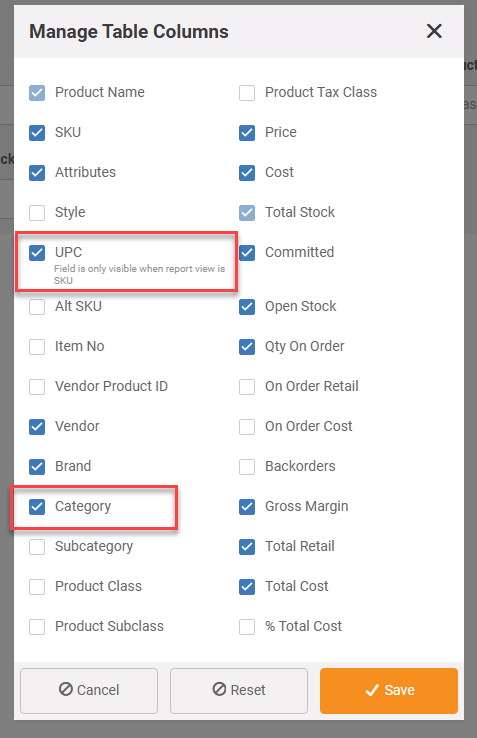
Select UPC to include UPC field in export. Once you have changed the visibility of the SKU field, you'll be able to add the UPC column to the export file.
Select Category to include Category In export. This is also the opportunity to add other columns to the report that may be helpful in your count, such as Category. Including categories will allow to to sort/filter count results in the CountApp by category. For example, if you are a firearms business, you'll want to add the categories with your regulated items, such as firearms, as these are serialized items and cannot be adjusted in bulk through the inventory update via a bulk CSV upload.
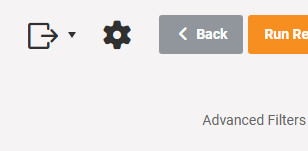
Export file to Excel. Once you have set up your filters and optional columns, you can export the file to Excel.
Convert to CSV file. PriceCompare uses the unformatted CSV file format to upload expected stock. To convert Excel to CSV, open in Excel and then re-save as a CSV file. If you have SKUs or other IDs that began with zeros, be sure to reformat the UPC column from General to Text. Before saving the file as a CSV.
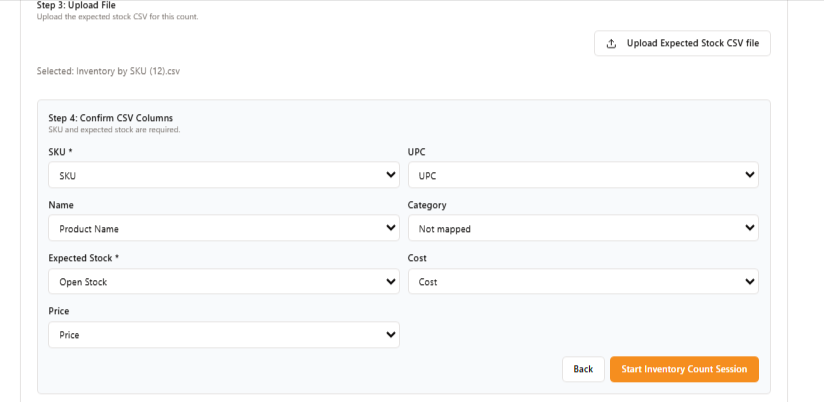
Import expected stock into PriceCompare. Once you've generated an expected stock file from your MicroBiz Cloud system, import that into the Count App. This will open a mapping tool that will look for the column headings in your CSV file and map them to the relevant fields in the Count App. If you'd like to filter your items by category in the Count App, be sure to add the category as an optional column in the MicroBiz export file.
Review Expected Stock
The next step is to review the data before beginning your comp
The 'View Uploaded Items' screen allows you to review the items used for the expected count. You can search for certain items and exclude them from the count.
You can also filter results by category, as well as items that should be included or excluded from the count.
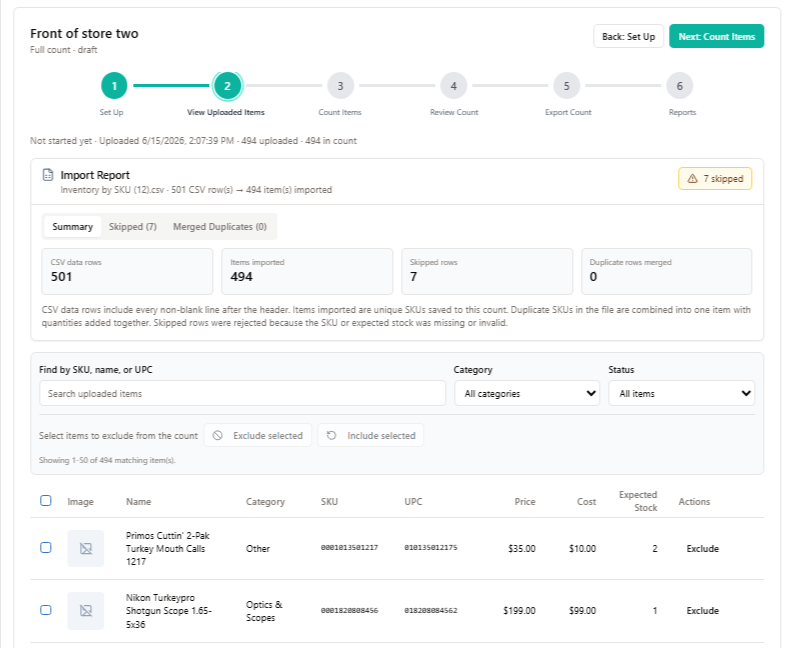
Important - Review 'Skipped' items. We also show you, at the tab at the top, which line items were skipped and for the reason that the items were skipped. Usually, this has to do with a missing or invalid stock count, such as a negative stock number. We recommend going back to MicroBiz and reviewing any items that were skipped, correcting open stock to reflect current stock levels prior to beginning your physical inventory count.
Common reason for skipped items: PriceCompare will skip adding items to the inventory count file for the following reasons:
1) Open stock is negative - in MicroBiz, items should have an open stock value of zero or positive. If you're selling items not in stock, those should be handled through the backorder function instead of allowing open stock to have a negative value in MicroBiz. We recommend reviewing these items in MicroBiz to determine why is MicroBiz displaying negative stock and correcting this in MicroBiz before proceeding with the import.
2) Open Stock field in MicroBiz is empty - in this case, MicroBiz is not including a value for open stock in the export. This is something that should be confirmed in MicroBiz before proceeding with the physical.
Conduct Count
The next step is the conduct the Physical Inventory Compact. Because the Count App is web-based, you can conduct an account on a variety of devices including:
- Laptop connected to a Bluetooth scanner
- Tablet with a Bluetooth scanner or camera
- Smartphone with a camera or Bluetooth scanner
You can scan the UPC or barcode with an embedded SKU, or manually enter the SKU or UPC into the search box. Unless this is a blind count, you'll be shown what the system expects for open stock, what has been counted to date in this session, as well as the count of the most recent scan. You can change the session count using the up and down arrows or the keypad with the quantity. There's also a button to use expected stock as the count quantity or to clear the count.

Review Count
Once you have completed your physical count, you can then review your count before generating your update spreadsheet.
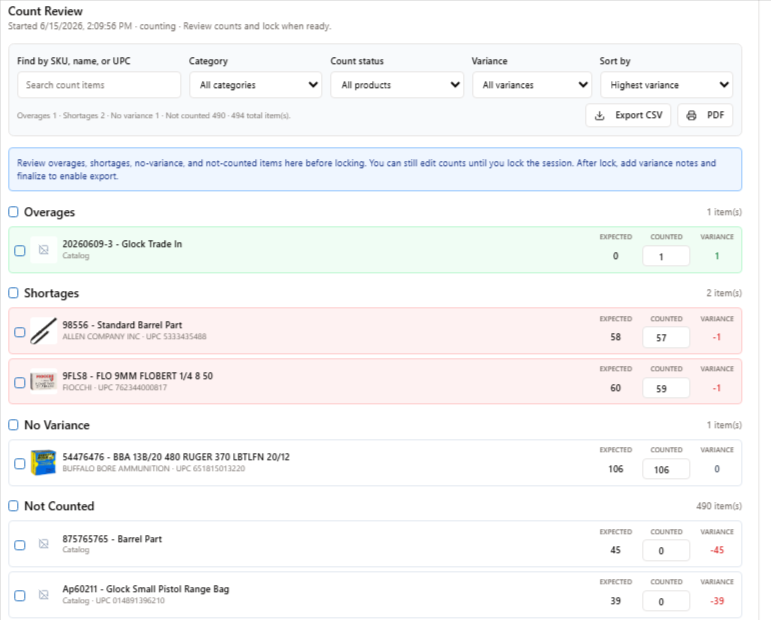
On the review screen, you can adjust for the following:
Overages - these are products where the count was greater than expected stock.
Shortages - These are products where the count was less than the expected stock.
No variance - These are products where the count was equal to expected stock.
Not counted - These were items that were not counted in your physical inventory count.
There are some bulk settings where you can select multiple rows and set the count to equal expected or to exclude those products from the export file.
Lock Count
Once you have reviewed all the overages, shortages, and variances and are comfortable that the count numbers in the application reflect what was physically counted on your shelves, you can go ahead and lock the count.
Locking stops scanner entry and opens variance review. Check the Not Counted section first if you want to confirm nothing was missed. Because this is a full inventory count, uncounted items will be treated as zero and can appear as shortages.
Once locked, you can also enter notes on each line item to record the reason for accepting an overage or shortage.
Adjust/Exclude Serialized Items
Non-serialized items will be adjusted in MicroBiz by importing a CSV file with the new count. However, serialized items cannot be adjusted in bulk through the CSV upload process. This is because if an item is marked "serial number required", MicroBiz restricts ad hoc adjustments to inventory. For example, if you have two items with two serial numbers in MicroBiz but you only count one item during the physical count, you can't just change the stock from 2 to 1 without also adjusting out a serial number.
Therefore, if any adjustments need to be made to a serialized item, you need to do that separately through the Inventory Adjustment module in MicroBiz. Please see https://cloudv2.microbizcloud.com/support/solutions/articles/9000188803-adjusting-stock-levels-using-inventory-adjustment-module
Finalize Count
Pressing the Finalize Count button will finalize the count. You'll see a summary screen showing you the results of the count. There will also be an option to view reports as well as to export a CSV file that can be uploaded into MicroBiz to adjust MicroBiz to your new count numbers.
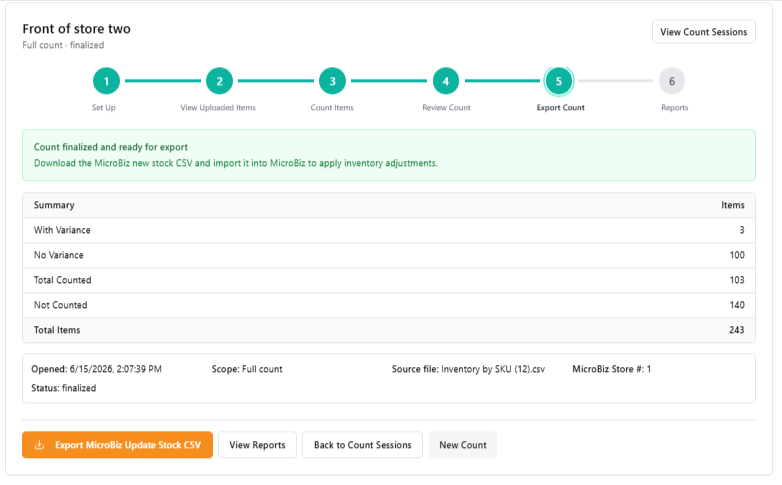
Export CSV for MicroBiz Import
To update your stock for the count in MicroBiz, export the finalize comp file to a CSV file. You can then import this file into MicroBiz using the adjust stock workflow.
For more information on how to do this please see https://cloudv2.microbizcloud.com/support/solutions/articles/9000199753-update-stock-balance-import-template-v2-0-
MicroBiz Errors Report
After completing your update stock via CSV file process in MicroBiz, be sure to review the error report. This will show you if there are any issues importing the stock updates and, in particular, show you any line items that were not updated. Common issues include
SKU not found - the SKU or UPC in the import file must match the SKU or UPC in the MicroBiz product records, depending on which ID you selected as the matching ID.
Serialized Items - You cannot update the open stock of serialized items via he bulk CSV import process. Any adjustments of stock of a serialized number required item must be made alongside a serial number. So if you increase open stock by one of a serialized item, you must add another serial number. If you reduce stock by one, you must remove a serial number from stock. As a result, you need to adjust stock of serialized items separately from the CSV import process through an inventory adjustment.

Mike, here is an error report
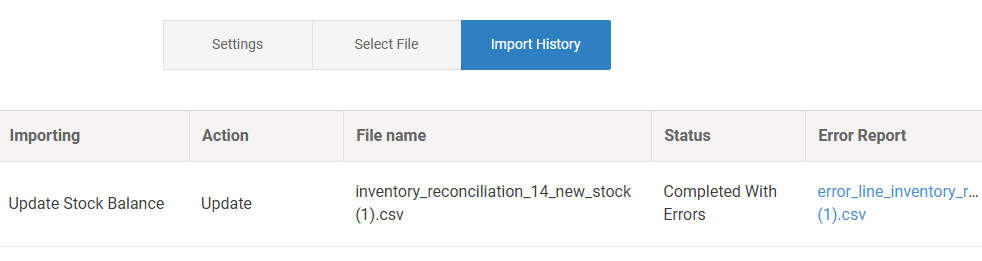
After running a stock update, it is very important for you to review the error report in MicroBiz. This will show you whether the import was successful and whether any product lines were skipped in the update.
Serial number item variances.
Count App Reports
Once you have locked the count, you can view audit reports and a results report.
Audit report - The audit report will show you each scan or entry of manual inventory levels, including the date of the scan as well as the employee that entered the information.
Results report- This report will compare the expected count and variance for each product in the count session. You will also see other information exported from MicroBiz with the product's record, including:
- Category
- SKU
- UPC
- price
- cost
You can export these results to PDF or CSV files.